Quickstart: Multi-Agent Workflow
This quickstart shows how to run a durable, multi-agent workflow using Dapr Agents and Workflows with Catalyst Cloud. The workflow acts as a customer support system that triages support tickets and provides troubleshooting resolutions through two cooperating AI agents.
You will learn how to:
- Provision a Catalyst project and related resources using the Diagrid CLI.
- Run multiple AI agents in a durable workflow using Dapr Agents
- Monitor multi-agent execution in the Catalyst web console
1. Prerequisites
Before you proceed, ensure you have the following prerequisites installed:
2. Log in to Catalyst
Authenticate to Diagrid Catalyst using the following command:
diagrid login
This command opens a new browser window where you log into Catalyst. Once logged in, you'll be shown a confirmation code (matching the code in your terminal) that you need to confirm.
Confirm your user details are correct using the following command:
diagrid whoami
The expected output contains the name of the organization, your user name, and the Catalyst API endpoint.
3. Clone Quickstart Code
Clone the quickstart code from GitHub:
git clone https://github.com/diagridio/catalyst-quickstarts.git
Navigate to the quickstart directory:
- macOS/Linux
- Windows
cd catalyst-quickstarts/multi-agent-workflow/python
cd catalyst-quickstarts\multi-agent-workflow\python
4. Configure OpenAI API Key
Add your OpenAI API key to resources/agent-llm-provider.yaml:
metadata:
  - name: key
    value: "YOUR_OPENAI_API_KEY"
Optionally, to use Anthropic instead of OpenAI, update resources/agent-llm-provider.yaml with:
apiVersion: dapr.io/v1alpha1
kind: Component
metadata:
  name: anthropic
spec:
  type: conversation.anthropic
  metadata:
  - name: key
    value: "YOUR_ANTHROPIC_API_KEY"
  - name: model
    value: claude-3-5-sonnet-20240620
5. Install Dependencies
Create a virtual environment:
python -m venv .venv
Activate the virtual environment:
- macOS/Linux
- Windows
source .venv/bin/activate
.venv\Scripts\activate
Install dependencies:
pip install -r requirements.txt
6. Run with Catalyst Cloud
The diagrid dev run command creates your Catalyst Cloud project (if needed), provisions resources (App IDs, Components, managed state stores for execution/memory/registry, and pubsub), configures environment variables, and sets up the connection between your local environment and Catalyst Cloud.
diagrid dev run -f dev-python-multi-agent-workflow.yaml --project dev-python-multi-agent-workflow --approve
Wait for the following log output to confirm the application is running before proceeding:
== APP - customer-support-system == INFO:     Application startup complete.
== APP - customer-support-system == INFO:     Uvicorn running on http://0.0.0.0:8003 (Press CTRL+C to quit)
7. Interact with Multi-Agent Workflow
The customer support workflow orchestrates two agents as child workflows with a decision point based on the triage result:
Test the Multi-Agent Workflow using the terminal or the REST Client extension with the test.rest file.
7.1 Trigger the workflow
From another terminal, trigger the workflow via REST API:
- macOS/Linux
- Windows
curl -i -X POST http://localhost:8003/workflow/start \
  -H "Content-Type: application/json" \
  -d '{"customer": "Alice", "issue": "My Dapr system fails to start in production."}'
Invoke-RestMethod -Method Post -Uri "http://localhost:8003/workflow/start" -ContentType "application/json" -Body '{"customer": "Alice", "issue": "My Dapr system fails to start in production."}'
The workflow will:
- Run the Triage Agent (check entitlement and urgency)
- Run the Expert Agent (retrieve environment info and generate a resolution)
- Return a customer-ready response with the proposed fix
The response will include the triage assessment and a detailed troubleshooting resolution from the expert agent.
7.2 Test non-entitled user
Try a query with a customer who does not have an entitlement to see how the workflow handles rejection by skipping the Expert Agent step:
- macOS/Linux
- Windows
curl -i -X POST http://localhost:8003/workflow/start \
  -H "Content-Type: application/json" \
  -d '{"customer": "Bob", "issue": "The Kubernetes Jobs controller keeps crashing on startup, in production!"}'
Invoke-RestMethod -Method Post -Uri "http://localhost:8003/workflow/start" -ContentType "application/json" -Body '{"customer": "Bob", "issue": "The Kubernetes Jobs controller keeps crashing on startup, in production!"}'
The response will indicate that the customer is not entitled to support, and the Expert Agent step will be skipped.
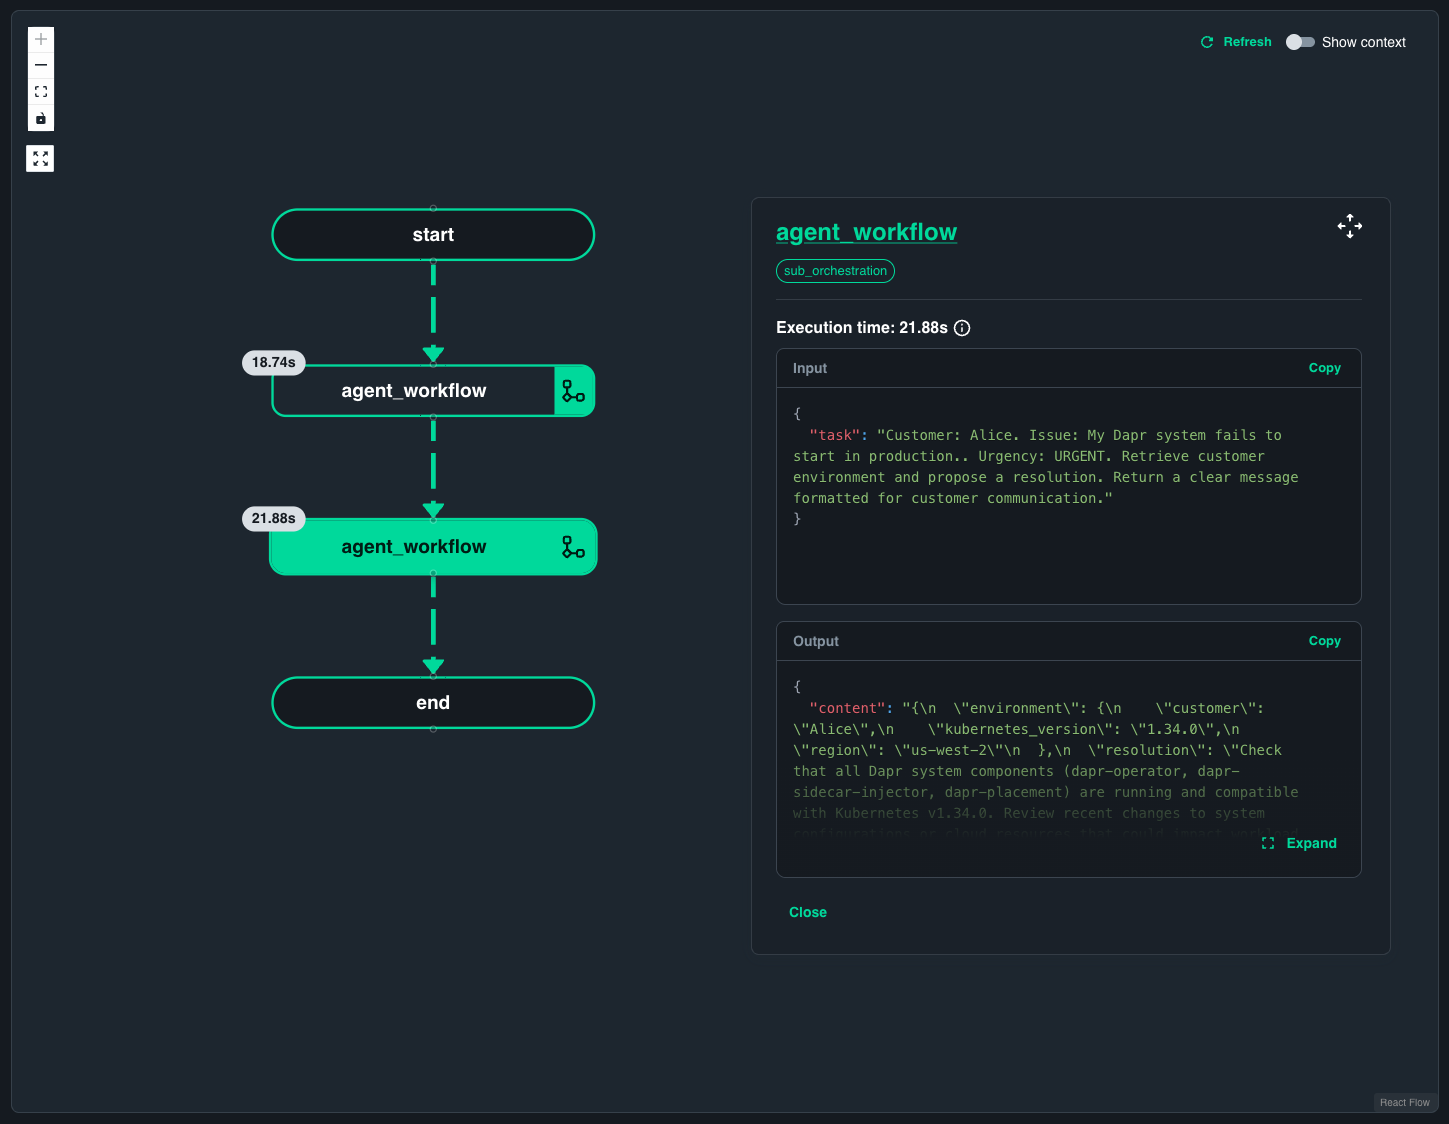
8. View in the Catalyst web console
Open the Workflow viewer in the Catalyst Cloud web console and navigate to the Workflows section. Select the workflow instance that corresponds to your multi-agent execution.
The Catalyst workflow visualizer shows the orchestrating workflow calling two agents as child workflows. You can navigate into each child workflow to inspect the details of what each agent is performing, giving you full visibility into the relationship from the orchestrating workflow down to each agent's execution.
9. Clean Up
Stop the running application by pressing Ctrl+C in the terminal where diagrid dev run is running.
Delete the Catalyst Cloud project to clean up all provisioned resources:
diagrid project delete dev-python-multi-agent-workflow
Summary
In this quickstart, you:
- Built a multi-agent customer support system with triage and expert agents using Dapr Agents
- Ran the workflow locally connected to Catalyst Cloud for durable execution and state persistence
- Observed multi-agent orchestration and workflow visualization in the Catalyst console
Next steps
- Explore the Dapr Agents Python SDK guide for more agent development patterns.
- Learn about AI Agent use cases and how Catalyst supports agentic workflows.
- Try the Durable Agent quickstart to build a single durable agent with tool-calling capabilities.
- Browse available conversation components for different LLM providers.